
Cloning Your Data to A New Hard Drive in Mac OSX by Jon Gunnison
There are plenty of ways to clone your older hard drive to your new hard drive. Laptop models - you may want to format and do the cloning process with the new hard drive inside of an enclosure before opening up your computer. If you purchased the Universal Drive Adapter, you already have the tools required for your laptop model computer. Tower models - you can install the hard drive inside of the computer without taking out the older one you will not require an enclosure. Note: Older Macs using ATA type drives may require you to configure the new drive as "slave" using the drive's jumper(s).
Booting into Your Old Hard Drive
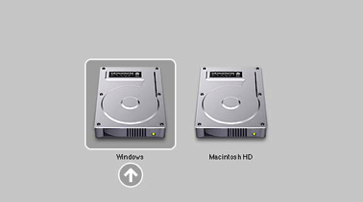
After you install the new hard drive, you will need to boot to your old hard drive. If you have an external enclosure for the old hard drive, you will plug that in via Firewire or USB, (Note: USB is only a bootable option on Intel Macs) then turn on your computer while holding down the Option key on your keyboard. This will give you a boot menu that looks like the picture to the left. Click on your old hard drive to start the booting process, and your Mac will start up normally after that.
Formatting Your New Hard Drive
Formatting the new hard drive will be the next step you will need to take to add a volume to the drive. Here is an instruction guide for the formatting process. http://www.newertech.com/tech_support/manuals/HDDppcintelformat/HDDppcintelformat.php
Acquiring The Cloning Software
There are many cloning programs out there. All are similar in cloning ability, but others may offer additional functions you may find useful. Some of the more popular ones are...
- 1. Apple's Disk Utility (included with OSX, located in Applications > Utilities folder)
- 2. Bombich's Carbon Copy Cloner http://www.bombich.com/
- 3. Prosoft's Data Backup 3 http://www.prosofteng.com/ These three in particular are explained below.
The Cloning Process
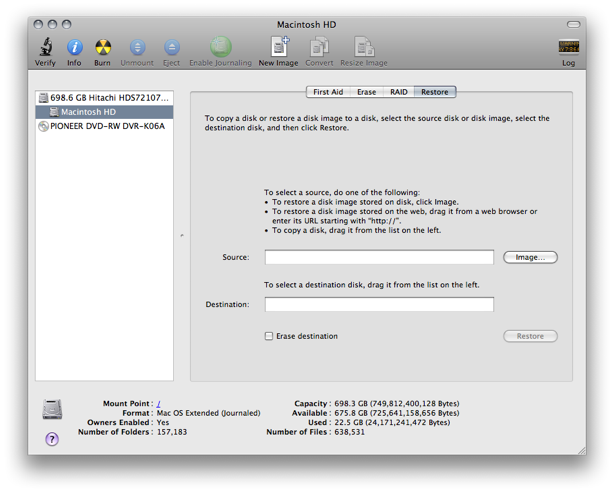
Apple's Disk Utility (10.3.x or Later)
Disk Utility does have the ability to clone your hard drives just as well as any other software out there. All you will need to do is...
- 1. Select your new volume (indented) and click on the "Restore" tab.
- 2. Drag your old volume to the Source field.
- 3. Drag your new hard drive to the Destination field.
- 4. Click the check box for "Erasing Destination".
- 5. Click restore at the bottom and it then will start copying over to your new hard drive.
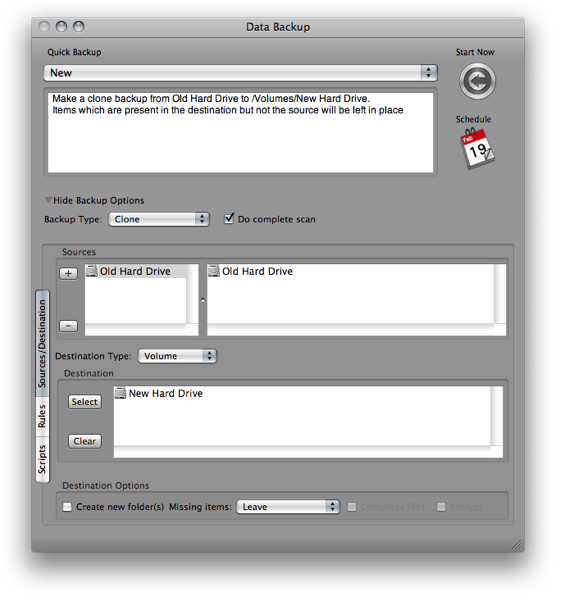
Prosoft's Data Backup 3
If you purchased our OWC On-The-Go DIY kit, you received a free copy of Prosoft's Data Backup 3.
(OWC Express DIY kits do not contain free software, see CarbonCopyCloner instructions below)
This will help you easily clone your old hard drive to your new hard drive. Open Prosoft's Data Backup.
- 1. Click on "Show Backup Options" to expand the drop down menu.
- 2. Select "Backup Type", then select "Clone".
- 3. Click the check box "Do Complete Scan".
- 4. Click on the "+" symbol under "Sources" and select your old hard drive from the "Devices" list in the Finder window.
- 5. Select your destination (your new hard drive) from the "Devices" list in the Finder window.
- 6. To finish, click "Start Now".
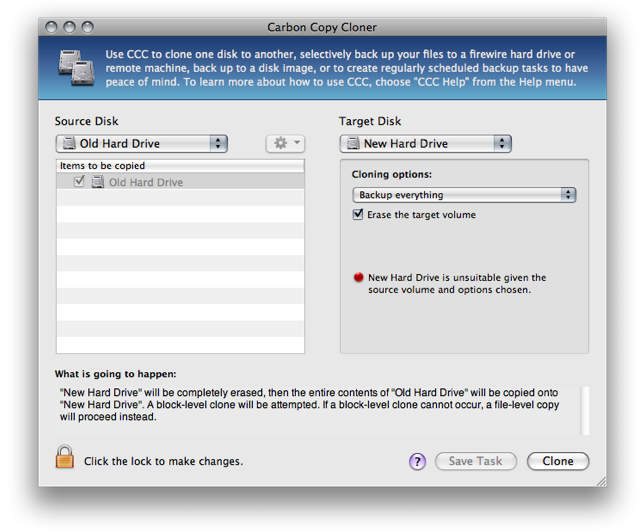
Bombich's Carbon Copy Cloner
Carbon Copy Cloner is a great cloning tool for creating a backup or copy of your hard drive. (Download Here)
- 1. Select your Source Disk (your old hard drive).
- 2. Select your Target Disk (your new hard drive).
- 3. Under cloning options, select Backup everything.
- 4. Just click Clone, and you're done.
Verifying your clone is Bootable
To do this, restart the computer and hold the "Option" key on your keyboard to load up the boot menu. You should see your old hard drive and your new hard drive as bootable drives. If you do not see the new hard drive, you will need to do the cloning process again. If you do see the new hard drive, click on it. Your Mac will boot into it and you will get your desktop. This will verify that your hard drive has cloned successfully. Before reformatting/erasing your old hard drive, you will want to verify the cloning processes was a successful, as well as being certain your new clone works exactly like your old hard drive. Be sure to include checking your applications, data files, etc.
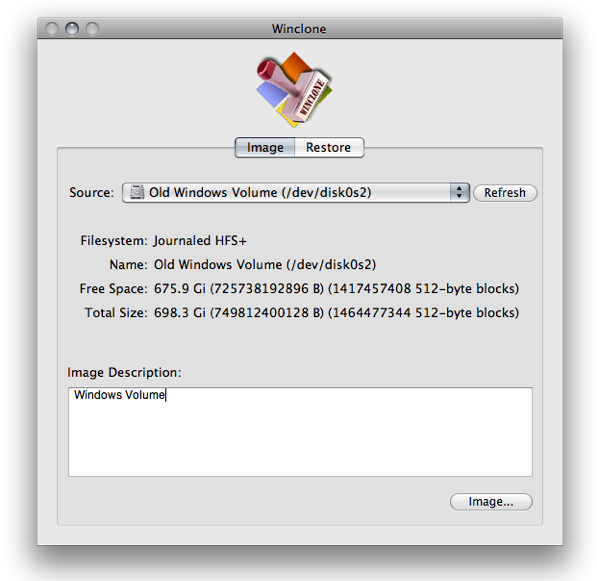
Cloning your Boot Camp Partition Winclone
Winclone is a program for cloning your Boot Camp partition. http://twocanoes.com/winclone/
- 1. Select your Boot Camp volume as "Source".
- 2. Click "Image..." at the bottom of the window. This will prompt you on where you want to save the image.
- 3. Save it to your desktop or an external hard drive.
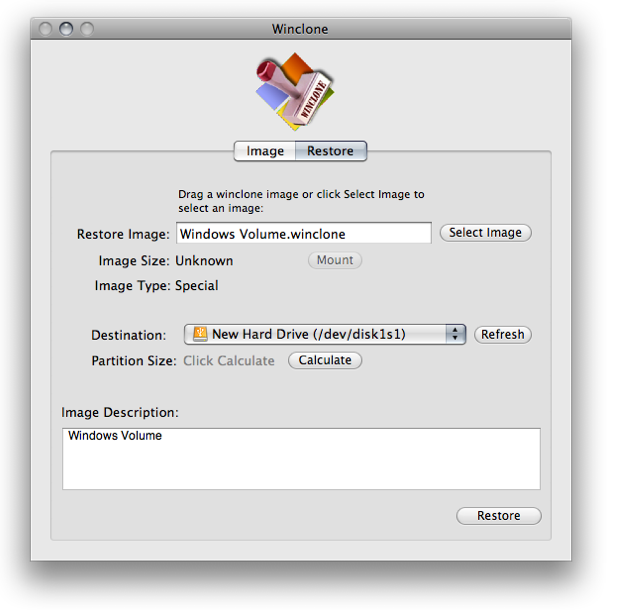
- 4. Click on the "Restore" tab, and select the image file you've just created.
- 5. Select the destination to be your new Boot Camp partition.
- 6. Click "Restore". It will start expanding & copying your Windows files to the new hard drive.